
Annotation Objects
(Available in the IceViewer TIFF and the IceViewer Pro)
The Annotation tab option allows the user to select an annotation object to be placed upon the opened image. There are several choices of annotation objects.

|
Text - Allows the user to create a text box by clicking and dragging. On the Text ribbon, users can specify the color, the font type, and the alignment of the text and also create a hyperlink out of the text. | |||

|
Comment - Allows the user to place a sticky note annotation on the document. The note icon remains on the same place even if the user is scrolling in the document. When clicking on the note icon, the note editor appears where the user can enter any text information, note or reminder. For more information about the Comment annotation, please refer to the Adding a Comment section. |
|||

|
Note - Allows the user to create an opaque box with a color specified by clicking and dragging. The user can input text as needed into this box. The user can choose whether they want the Note to have an opaque background by checking the Opaque Background menu item. For more information about the Note annotation, please refer to the Adding a Note section. |
|||

|
Highlight - Allows to create a transparent box with a color specified by clicking and dragging. Items below the highlighted section are displayed with a transparent colored background. Once placed on the document, the Highlight annotation cannot be moved. For more information about the Highlight annotation, please refer to the Highlight section. |
|||

|
Shapes – Allows users to place various shapes on the document by selecting the desired shape from the Shapes drop-down menu. The following shapes are available: |
|||

|
Rectangle - Allows the user to click and drag to create a thin, unfilled rectangle with a color specified and with a width specified at the Line Width item. The rectangle borders are opaque and the rectangle covers objects beneath it. | |||

|
Ellipse - Allows the user to click and drag to create a thin, straight line with a color specified and with a width specified at the Line Width item. The ellipse borders are opaque and the ellipse covers objects beneath it. | |||

|
Rounded rectangle - Allows the user to click and drag to create a thin, unfilled rounded rectangle with a color specified and with a width specified at the Line Width item. The rectangle borders are opaque and the rectangle covers objects beneath it. | |||

|
Block arrow - Allows the user to click and drag to create a thin, unfilled arrow shape with a color specified and with a width specified at the Line Width item. The ellipse borders are opaque and the ellipse covers objects beneath it. Right, left, up, and down arrow shapes are available. | |||

|
Arrow - Allows the user to click and drag to create a straight line with an arrow from a base point in any direction. The Arrow type and color can be specified with a width at the Line Width item. The arrow is opaque and covers objects beneath it. | |||

|
Line - Allows the user to click and drag to create a straight line from a base point in any direction. The color can be specified with a width at the Line Width item. The line is opaque and covers objects beneath it. | |||

|
Pencil - Allows the user to click and drag to create a freehand line. The line will have the color specified. | |||

|
Redact - Allows the user to click and drag a rectangle area over the document to create an opaque black, white or custom colored to cover text on image to be blocked from user. One must be Burn the Redact into the image to be permanently erased. Once placed on the document, the Redact annotation cannot be moved. | |||

|
Whiteout - Allows the user to click and drag rectangle area over the document to create an opaque white area to cover text on image to cover the text from user to see. One must be Burn the Whiteout into the image to be permanently erased. Once placed on the document, the Whiteout annotation cannot be moved. | |||

|
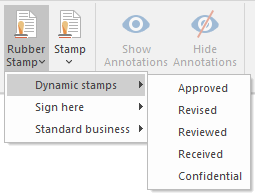
Rubber Stamp - Allows the user to place a dynamic or predefined rubber stamp on the document. To read more please see the Adding a Rubber Stamp section of the manual. | |||
|
||||
|
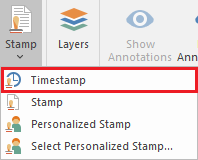
Timestamp - Allows the user to add timestamp to the image with personalized date and time format, time zone, and additional text. For more information, please see Adding Timestamp . | |||
|
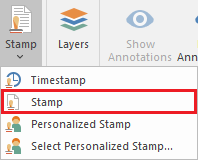
Stamp - Allows the user to stamp a PDF, BMP or TIFF image onto the TIFF image. | |||
|
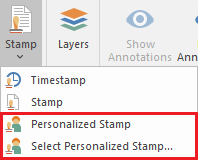
Personalized Stamp - Allows the user to stamp a signature or other personalized images onto the TIFF image. The user can set up a personalized stamp annotation by using the Select Personalized Stamp option. The supported image formats are PDF, BMP and TIFF. For more information about Personalized stamps, please refer to the Adding a Personalized Stamp section. | |||

|
Watermark - Allows users to overlay custom text or files onto TIFF documents. To read more about adding watermark, please refer to the Adding a Watermark section of the manual. | |||