The Black Ice Printer Drivers have a built-in feature to upload printed documents to the designated SharePoint servers instantly. In the Printer Manager, each available Printer Driver and Agent Printer can be assigned to a separate SharePoint directory. The SharePoint upload feature is available from version 12.00 (2010.03.19) in every Printer Driver.
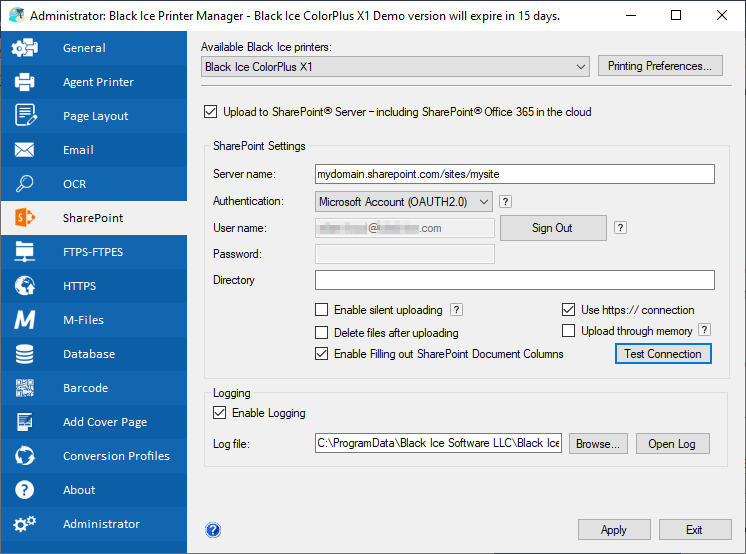
To configure the Printer Driver to upload the printed documents directly to SharePoint, please open the Printer Manager, navigate to the SharePoint tab, and enable the Upload to SharePoint Server option.

SharePoint Settings
Server name
The complete URL of the server, without http:// or https://. For example: mydomain.sharepoint.com/sites/sitename.
Authentication
The user can select the authentication method from the Authentication dropdown menu. The Username and Password method is used by older SharePoint servers, while the more secure Microsoft Account (OAUTH2.0) authentication can be used with SharePoint 365 Servers.
Directory
The full path of the upload directory. The upload directory needs to be determined correctly before uploading files. A complete SharePoint website URL is usually looks similar as the following example: https://servername/sites/sitename/libraryname/foldername/. The Directory field should be filled with the libraryname/foldername part of the URL above. The directory cannot start with a forward slash (/) character.
Enable Silent uploading
If the Enable Silent uploading option is checked, the Printer Driver uploads every file to the SharePoint server in the background. The upload window and error messages will not be displayed; however, the error messages are still recorded in the log file.
Use https:// connection (SSL)
SSL (Secure Sockets Layer) is a protocol that provides communication security over the Internet. Selecting the Use https:// connection option, the Printer Driver will use secure https protocol to upload every file to the SharePoint server.
Delete files after uploading
If the Delete files after uploading option is enabled, the Printer Driver automatically deletes the files after the uploading has finished.
Upload through memory
If the Upload through memory option is enabled, the Printer Driver will upload the printed document to the SharePoint Server through memory, without writing the file to the local disk.
Enable Filling out SharePoint Document Columns
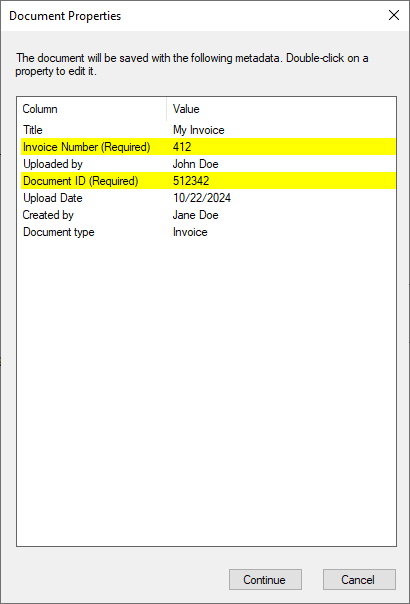
If the Enable Filling out SharePoint Document Columns option is checked, the Document Properties window will appear each time a document is printed to the Printer Driver, where the user can edit the columns (property values) of the uploaded document.
Test Connection
To make sure the SharePoint upload has been configured successfully, please click on the Test Connection button. If the connection is established successfully, the following window appears.
Logging
If the Enable Logging option is checked, every SharePoint related message is recorded in the specified log file. The log file contains information about: Upload start date, Source file, URL, User, Silent mode, Upload finish date, and result.
Editing document properties during upload
On the Document Properties window, the metadata associated with the uploaded document can be edited. To use this feature, please make sure that the Enable Filling out SharePoint Document Columns option is enabled.
To edit a property value, please double-click the property. Required properties are highlighted in yellow and must be filled. The properties displayed in the Document Properties window can be configured in SharePoint. Please note, if silent uploading is enabled the Document Property window will not be displayed for the user.

The SharePoint uploader supports the following column data types:
- Single line of text
- Multiple lines of text
- Number
- Yes/No
- Person or Group
- Date and time
- Choice
- Hyperlink
- Currency
The SharePoint uploader does not support the following column data types:
- Location
- Image
- Managed metadata
- Lookup