Optical character recognition or OCR is the conversion of digitized documents into an editable text file. It is a widely used as a form of digital document processing for documents stored in Image file formats such as TIFF, DICOM, JPEG, PDF, etc… to store, archive any kind of document such as invoices, medical records, sales receipts, mail, or scanned documents.
Users can OCR documents, pages or selected areas of any printable document/image on the Printer Driver’s OCR Tab (Start > Control Panel > Printers and Devices > right click on the Black Ice Printer Driver > Printing Preferences > OCR tab).
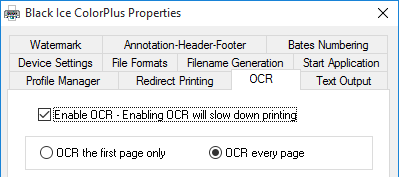
If the Enable OCR – Enabling OCR will slow down printing checkbox is checked, the Printer Driver will extract the text from the printed document/image with the specified configuration, and open the OCR file within the specified text editor.
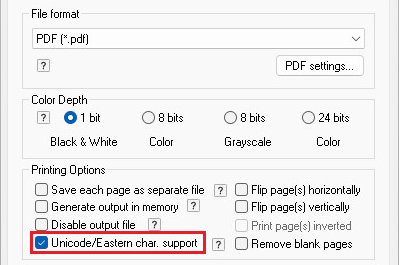
NOTE: To OCR documents which contain any special or accented characters, please check Unicode/Eastern char. support option in File Formats Tab:
OCR documents or selected areas
Users can OCR entire documents and multipage files from the first page of the document or specified areas on the documents and pages.
- OCR the first page only – If this option is selected, the Printer Driver will OCR only the first page of the document. If the Select OCR area option is also enabled, the Printer Driver will OCR the specified area on the first page of the printed document.
- OCR every page – If this option is selected, the Printer Driver will OCR every page of the printed document. If the Select OCR area option is also enabled, the Printer Driver will OCR the specified area on every page of the printed document.
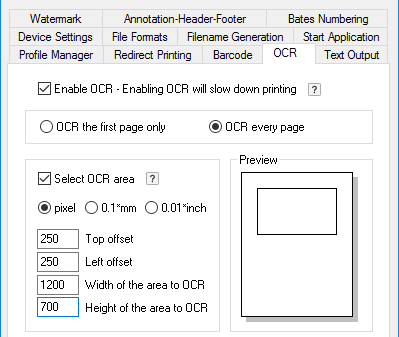
- Select OCR area – If this option is enabled, the Printer Driver will OCR only the selected area of the printed pages. The Select OCR area can be configured with the following options:
- Pixel/mm/inch – Users can specify the type of unit to configure the selected area.
Top offset – Users can configure the top offset of the selected OCR area.
For example, if the users configure 500px for Top offset, the Printer Driver will OCR the following area in case of an A4 sized document: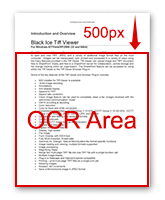
Left offset – Users can configure the left offset of the selected OCR area.
For example, if the users configure 500px for Left offset, the Printer Driver will OCR the following area in case of an A4 sized document: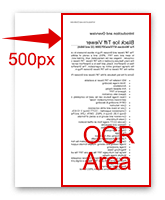
Width of the area to OCR – The users can configure the Width of the selected area to OCR.
For example, if the users configure 1500px for Width of the area to OCR, the Printer Driver will OCR the following area in case of an A4 sized document: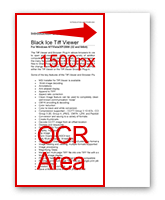
Height of the area to OCR - The users also can configure the Height of the selected area to OCR.
For example, if the users configure 1700px for Height of the area to OCR, the Printer Driver will OCR the following area in case of an A4 sized document: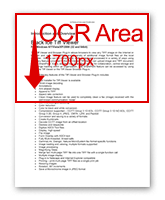
Preview - The users can see the preview of the configured size of the area to OCR on the printed document.
NOTE: For the correct OCR result, please make sure the selected area covers the whole letters. Truncated letters may result incorrect OCR output.
Select OCR Language
The selected OCR language contains data about the character set used in the language, and the OCR results will be more accurate if the user selects the language in which the document is written in. By default only the English OCR language is available in the Black Ice Printer Drivers.

Additional languages can be added by installing the OCR language pack from the following link: OCR Language Pack for Printer Drivers.
OCR Format
In the OCR Format area, users can select the desired format of the extracted/recognized text output.
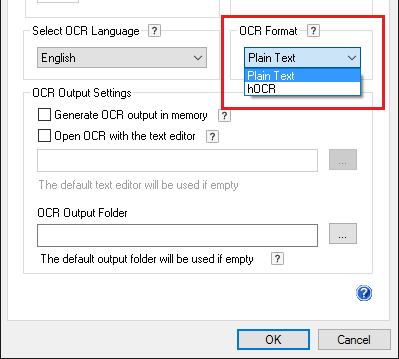
OCR format could be one of the following options:
- Plain Text option generates plain text output without formatting, position and font information.
- hOCR option generates an XHTML formatted output file with position and layout information with HTML file extension. This option is recommended if one intend to convert the text back to formatted document. For more information about hOCR, refer to the following link: https://kba.github.io/hocr-spec/1.2/
Open OCR
Users can configure the Black Ice Printer Drivers to open the OCR file automatically after the printing is finished, with the specified text editor. By default, the OCR files will be opened with Notepad text editor. Also, users can configure the OCR to generate the extracted text into memory, to ensure HIPAA compliance.
Use the “Generate OCR output in memory” option to generate a text file in memory instead of creating a file on the disk. The printer driver creates the file in memory and then passes the data to an application, through the messaging interface, which can save the text output in a database or process the text in memory. To capture the generated output file in memory, one can use the Print to Memory Samples in the Printer Driver Resource Toolkit.
NOTE: When the “Generate OCR output in memory” is enabled, the Open OCR and OCR Output Folder features are not available.
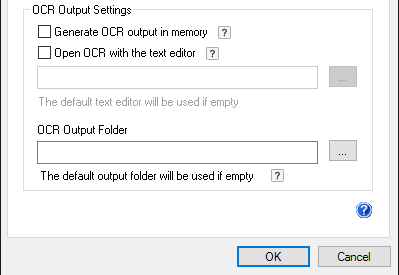
To specify a text editor to open the OCR file after each printing, enable Open OCR with the text editor checkbox and browse the executable file of the text editor.
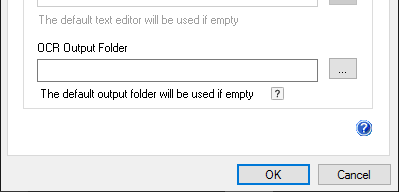
OCR Output Directory
Users can specify the Output Directory, where the Black Ice Printer Driver saves the OCR file after each print job. By default, the Output Directory is the same as the Printer Driver’s: <<USERPROFILE>>\Documents
NOTE: When the “Generate OCR output in memory” is enabled, the Open OCR and OCR Output Folder features are not available.