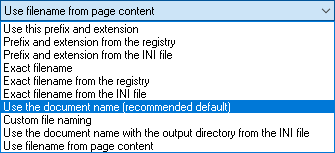
Select how to generate the filename from the dropdown list. The following options are available:
- Use this prefix and extension
- Prefix and extension from the registry
- Prefix and extension from the INI file
- Exact filename
- Exact filename from the registry
- Exact filename from the INI file
- Use the document name
- Custom file naming
- Use the document name with the output directory from the INI file
- Use filename from page content
Use this prefix and extension
The first three characters specified in the Filename Prefix edit box and random numbers are added.
For example: AAA1F6D.PDF (If AAA specified as prefix)
NOTE: Only the first 3 characters from the Filename Prefix field are used, if it is longer, the string is truncated.
Filename Extension shows the current extension of the files. If the Use custom extension setting is selected, the extension will be replaced with the entered extension. If the Use Custom Extension is unchecked, the default extension for the selected file format is used.
Prefix and extension from the registry
The filename prefix and the extension will be read from the specified registry key. The registry path must be under the "HKEY_LOCAL_MACHINE" root key. Use the File Name Prefix value for the file prefix and the File Name extension value name for the extension.
Prefix and extension from the INI file
The filename and the prefix will be read from the specified .INI file. The driver searches in the .INI file for a section with the printer name. Use the File Name Prefix key for the file prefix and the File Name extension key for the extension.
The user can search for an existing .INI file, create a new one, or edit the selected file using the browse […] and edit [Edit] buttons.
[Black Ice ColorPlus]
File name prefix=ABC
File name extension=TIFF
NOTE: Environment variables cannot be used to specify the INI file.
Exact filename
The printed file is generated with the same name specified in the Enter the filename edit box.
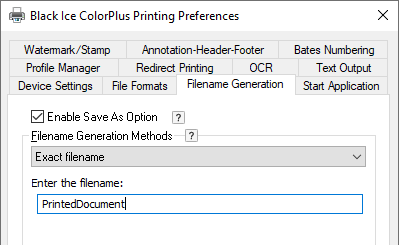
NOTE: It is recommended not to give file extension, just the file name, when using the Exact filename option.
If Exact filename is selected, and a filename with extension is provided, (for example, PrintedDocument.jpg) the printed document is named with the .jpg extension and the settings under the File Formats tab are ignored.
For example, the PDF file format is selected under the File Formats tab,
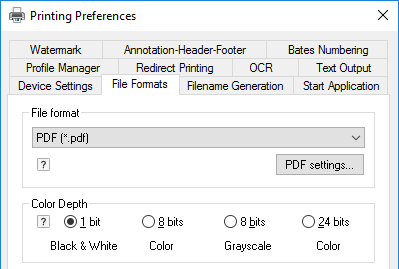
and the PrintedDocument.jpg file name is provided while the Exact filename option is selected under the Filename Generation tab.
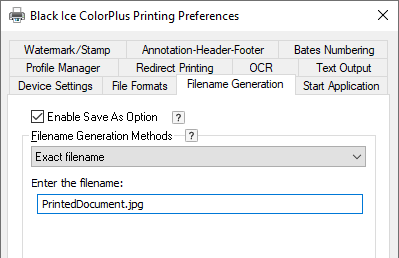
The result is a printed PDF document with the name of PrintedDocument.jpg that cannot be opened in Adobe Acrobat Reader.
Exact filename from the registry
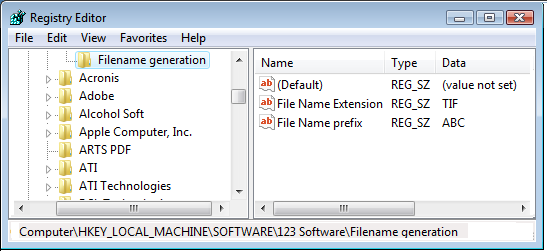
The Printer Driver can be configured to read the exact filename from a specified registry key. The registry path must be under the "HKEY_LOCAL_MACHINE" root key, and the value name containing the filename must be File Name as on the image below. The filename can be specified with or without the path.
In case of specifying the filename without the path, the Printer Driver saves the file to the output directory configured in Control Panel > Printers and Devices > right click on the Printer > Printing Preferences > Filename Generation > Output Directory.
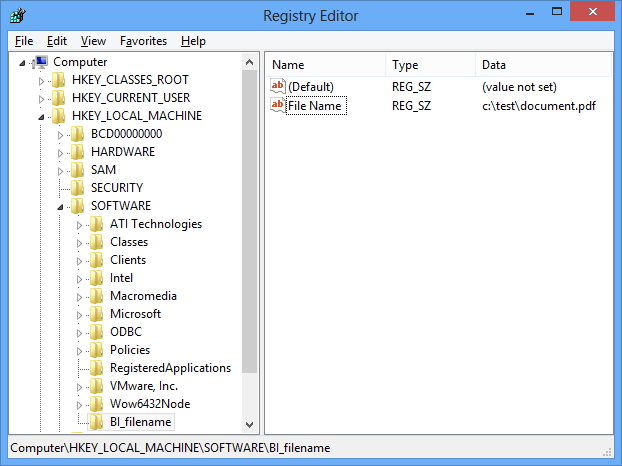
Enter the registry key location in the ‘Enter the registry path’ input field. Based on the example image above, the registry key will be configured as the following:
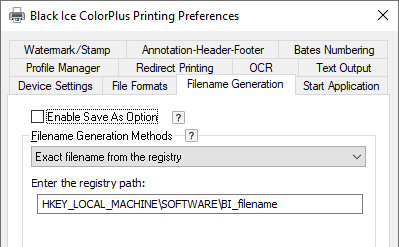
When finished, click on Apply to save the changes.
In this example, when printing to the Black Ice Printer Driver, the document.pdf will be generated into the c:\test directory.
NOTE: Before printing, please make sure that the “Enable Save As Option” is unchecked, the configured output directory is existing and the user has full access privilege to the configured output directory.
Exact filename from the INI file
The Printer Driver can be configured to read the exact filename from a specified INI file. Create a text file with .ini extension with any text editor and specify the installed printer driver name’s in [] brackets and the exact filename in a new line as in the following example:
[Black Ice PDF] File name = c:\documents\document1.pdf
OR if the printer is renamed
[My Printer Name] File name = c:\documents\document1.pdf
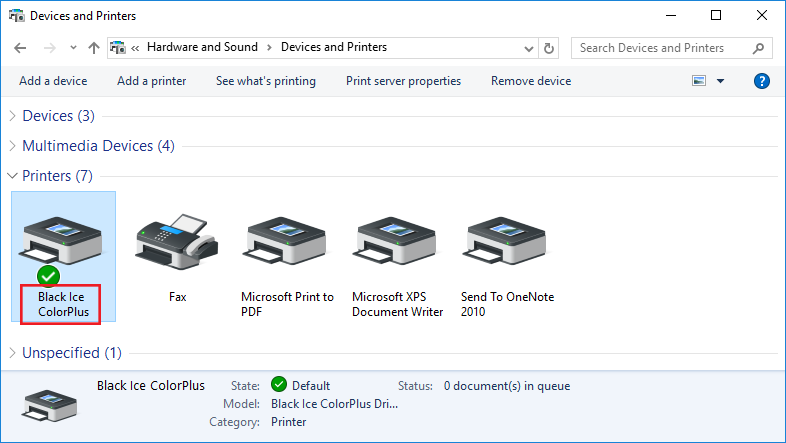
[Black Ice PDF] must contain the installed printer driver name on the system. If you are not sure what the printer driver’s name is that you are using, go to Control Panel > Printers and Devices, and copy the name of the printer driver you would like to configure for exact filename generation.
File Name = must be the exact filename. The printer driver will save the converted documents with this exact filename. The filename can be specified with or without the path. In case of specifying the filename without the path, the Printer Driver saves the file to the output directory configured in Control Panel > Printers and Devices > right click on the Printer > Printing Preferences > Filename Generation > Output Directory.
When finished editing the INI file, save the file and enter the file’s location in the “Enter the full path and filename of the INI file” field as in the following example:
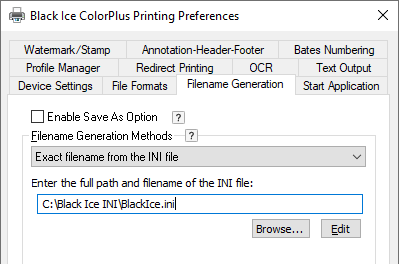
On this example, the Printer Driver reads the filename from the c:\Black Ice INI\BlackIce.ini file
The Printer Driver searches the .INI file for a section with the printer’s name in [] brackets and uses the File Name key for the filename when converting a document. For example:
[Black Ice PDF] File name = c:\documents\document1.pdf
Users also can edit the selected file using the browse […] and edit [Edit] buttons.
In this example, when printing to the Black Ice PDF Printer Driver, the document1.pdf will be generated into the c:\documents directory.
NOTE: Before printing, please make sure that the “Enable Save As Option” is unchecked, the configured output directory exists and the user has full access privilege to the configured output directory.
NOTE: Environment variables cannot be used to specify the INI file.
Use the document name
The driver uses the document name of the application passes to the driver when generating the name of the output document.
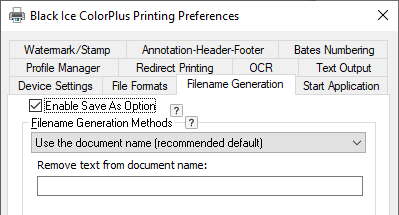
The ‘Remove text from document name’ feature allows one to remove characters from the document name. Many applications like Microsoft office or Cristal Report place a prefix front of the document name. For example a Crystal Report document name start with “Crystal Reports - ABC - (CC_Code39_S3)” but the user only wants “ABC - (CC_Code39_S3)”.
If the document name does not contain the given text, the filename of the output document remains the original document name. The maximum length of the ‘Remove text from document name’ is 259 characters.
If the Combine/Merge multiple documents into a single file option is not checked and the output filename already exists, the printer driver adds a number to the end of the filename. For example, if Test.tif already exists, the next output filename is Test (1).tif. If Test (1).tif already exists, the next printed image file is Test (2).tif, and so on. The previously printed documents are not overwritten.
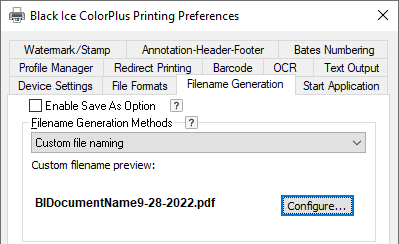
Custom file naming
Custom file name scheme can be built using the Custom File Name utility. A preview shows the selected custom file naming scheme if the output contains multiple files. If the result of the document conversion is a single output file, for example, PDF file, the filename follows the first line of the example. Press Configure… to modify settings. To use custom file naming scheme, disable the Enable Save As Option.
Use the document name with the output directory from the INI file
One can configure an INI file which specifies the output directory path where to save the generated documents. In order to use the output folder from an INI file, select the Use the document name with the output directory from the INI file option, browse to an INI file. The INI file must contain the following information:
[Black Ice ColorPlus] OutputDirectory=C:\temp
The printer driver name must be specified in the INI file as [Black Ice ColorPlus]
The output folder must be specified as OutputDirectory=C:\temp and can be substituted with the desired output folder.
Enter the full path and filename in the INI file - Enter the INI file’s location in the “Enter the full path and filename of the INI file” field of the printer driver “Filename Generation” tab.
The field limit is maximum 260 characters and the field cannot be empty
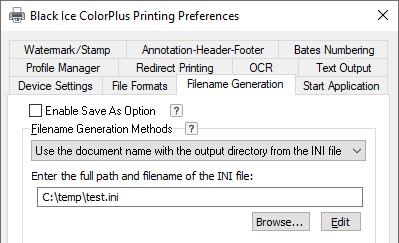
On this example, the Printer Driver reads the output directory location
from the c:\temp\test.ini file
Users also can edit and selected INI file location by using the browse […] and edit [Edit] buttons.
Use filename from page content
By using the Use filename from page content feature, the file name of the created output file can be specified. To specify the file name add the Filename tag to the first page of the document.
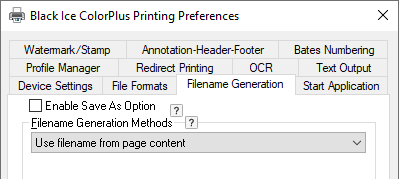
It is possible to specify the filename only, with or without extension, or the full path to the file. If the extension is not specified, the default extension is used according to the file format set in printing preferences. E.g.:
- ##~~Filename=Invoice number~~
- ##~~Filename=Invoice number.pdf~~
- ##~~Filename=c:\output\Invoice number.pdf~~
NOTE: The “Filename” tag must be on the first page of the printed document.
If the “Save each page as separate file” option is checked in Printing Preferences > File Formats tab,
The content based file name “Filename” tag in the document must be on every page.
The maximum length for the file path including document name is 259 characters.
The file name file path cannot contain the special characters of Tilde and Asterisk “~~ and **”
Some limitation of the "Use filename from page content":
- One cannot use - Save As option
- One cannot use - Merge Document option
For Example:
The following “Filename” tag is embedded on the printed document:
##~~Filename=Invoice 0066050137~~
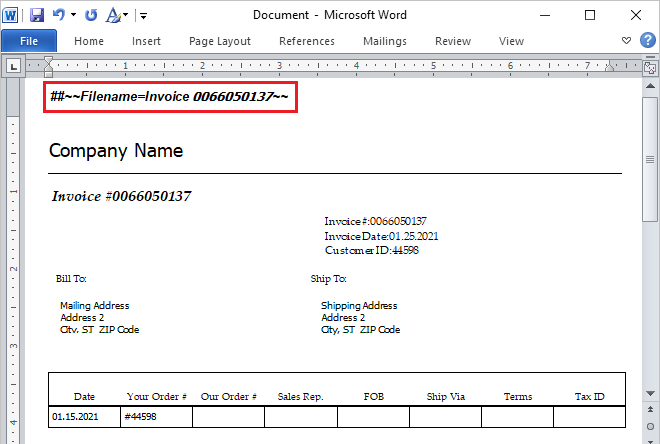
(MS Word document with the embedded “Filename” tag)
Printing the document results with the following filename and the “Filename” tag is removed from the page:
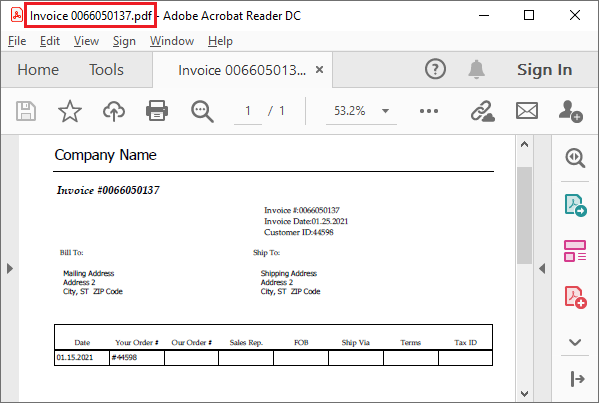
(Printed document with the generated filename)