The Black Ice X1 Printer Drivers have a built-in feature to upload the converted documents to a database through an ODBC connection. This feature is available from version 15.95 in every X1 Printer Driver.
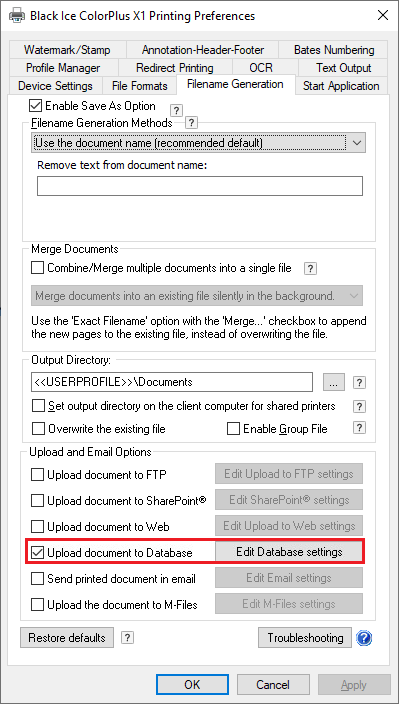
One can enable the Upload document to Database feature in Control Panel > Printers and Devices > right click on the Black Ice Printer Driver > Printing Preferences > Filename Generation Tab > Upload document to Database.
Click on the Edit Database settings button, to configure the uploading preferences.
NOTE: Each user can have separate Upload to Database settings, and if needed, each user can configure separate Agent Printers for different Upload to Database scenarios, with different settings.
On the appearing window, one can select a configured ODBC data source on the computer, and provide the necessary username and password. For detailed information about how to configure an ODBC data source on the computer, please refer to the following link.
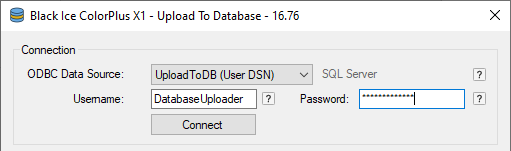
ODBC Data Source: One can select the destination ODBC data source to upload the documents to.
Username: Username for the selected ODBC data source connection.
Limitations: Any digits, letters or special characters.
Length: Must be between 1 and 255 characters.
Validation: Cannot be empty.
Default value: empty.
Password: Password for the selected ODBC data source connection.
Limitations: Any digits, letters or special characters.
Length: Must be between 1 and 255 characters.
Validation: Cannot be empty.
Default value: empty.
Once the connection is set press Connect button to connect to the database. If the connection is successful, the Table and indexing preferences become enabled.
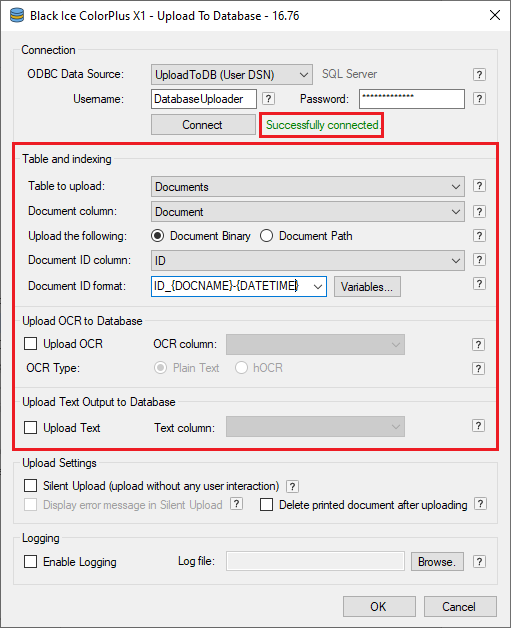
Table to upload: One can select the table name from the selected ODBC connection to upload the documents into.
Document column: One can select the column where the uploaded documents will be stored.
Upload the following: Select the Document Binary to upload the entire document to the database, or select Document Path to upload only the location and filename of the printed document.
Document ID column: Select the column where the ID/Index of the uploaded document will be stored. The Document ID can be an identifier string allowing users to easily distinguish and identify the uploaded documents.
Document ID format: The Document ID format specifies how the Document ID/Index will look like. One can insert variables, letters, digits, dash (-) and underscore (_) characters.
Limitations: Letters, digits and any of the following characters: } { - _
Length: Must be between 1 and 1000.
Validation: Cannot be empty.
Default value: {DOCNAME}
One can insert variables by pressing the Variables… button. The following window appears:
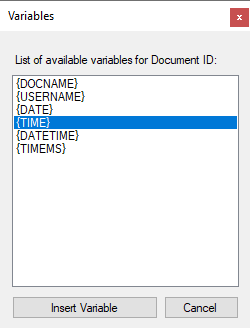
One can insert variables by double-clicking on it, or click on Insert Variable button. The variable will be inserted into the cursor position in the Document ID format field.
The Document ID format can have the following variables, and their combinations:
|
Name |
Tag |
|
Document Name |
{DOCNAME} |
|
User Name |
{USERNAME} |
|
Computer Name |
{COMPUTER} |
|
Date |
{DATE} |
|
Time |
{TIME} |
|
Date and Time |
{DATETIME} |
|
Time with Milliseconds |
{TIMEMS} |
|
Any alphabetical letter, digit or ‘-’ or ‘_’ |
|
Upload OCR to Database
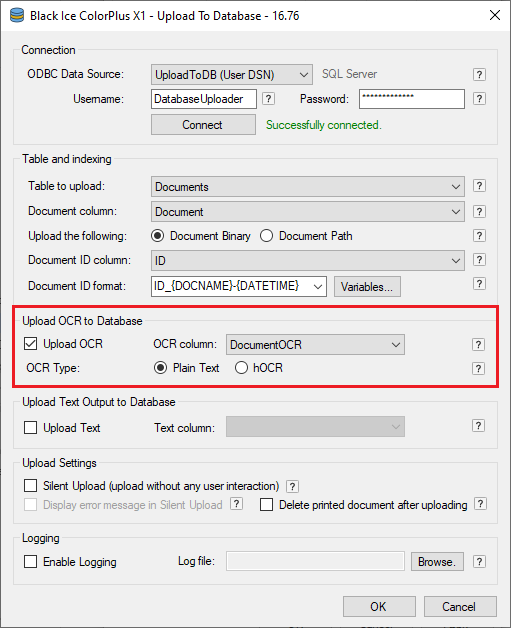
· Upload OCR: Enables uploading OCR (Optical Character Recognition) text to the database. When this option is enabled, and the Printer Driver generates OCR text during the printing, the Upload to Database feature will upload the text to the selected OCR column.
· OCR column specifies the column name where the OCR text will be uploaded.
· OCR Type specifies the generated OCR format. Possible options:
o Plain Text type only contains the text information. Use this format if you only need the text without text positions.
o hOCR type contains an HTML formatted document, which contains text information, positions and alignment. Use this type if you need text, positions and alignment.
Upload Text Output to Database
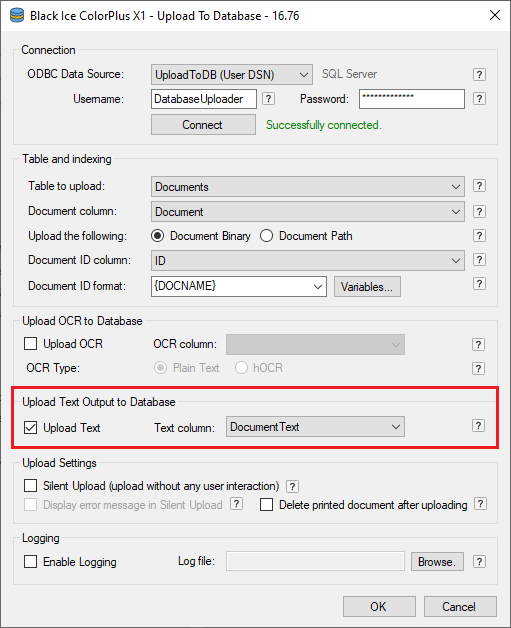
· Upload Text: Enables uploading text output to the database. When this option is enabled, the Printer Driver generates the text output during printing, and the Upload to Database feature will upload the extracted text to the selected Text column.
· Text column specifies the column name where the extracted text will be uploaded.
Upload Settings
· Silent Upload: When Silent Upload is enabled, the Upload to Database feature will upload the documents without any user interaction. In Silent Upload, no error or success message will be displayed. Silent Upload is unchecked by default.
If Silent Upload is unchecked (disabled), the Upload to Database feature displays the following window; one can specify the username and password for the configured ODBC Data Source.
Click on the Save the information and do not show this window again checkbox, to save the entered username and password, and turn on Silent Upload.
· Display error message in Silent Upload option will display the occurring error messages even if Silent Upload is enabled.
NOTE: This option should not be used when printing from a shared printer driver, or printing from a Windows service.
· Delete printed document after uploading option will delete the printed document from the local computer after the upload is finished. The document will be deleted even if the upload failed due to any reason.
Enable logging: If this option is enabled, the Database Uploader will log every uploading into the specified log file. The log file will contain the following information:
· Date and Time,
· Error code and message,
· Username initiated the download
· Filename
· ODBC Data Source
· In case of successful upload, the Document ID/Index.
Example of how the log looks like:
11/07/2019 10:49:59 | File successfully uploaded, John, c:\docs\MyDocument.TIF, odbc_Documents, ID_MyDocument_20191107104959222
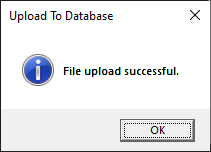
Click on the OK button to start uploading the document. If the uploading was successful, the following window appears if the silent mode is not enabled:
Limitations:
· The Disable output file option must be disabled on the File Formats tab to use the Upload document to Database feature. To upload the document without saving the file on the computer, please make sure the Delete Printed document after uploading option is enabled in the Upload to Database Settings.
· Please make sure the Upload document to Database option is enabled during installation, otherwise, the option will be grayed out and cannot be used. In this case, alternatively, the user can configure the uploading in the Printer Manager, or try uninstalling the printer driver, restarting the system, and reinstalling the Printer Driver.
For more information, please refer to the following sections of the online manual:
Configure ODBC Data Source for print Document to Database
Configuring an MS SQL Database for Upload to Database feature
Database Table structure and column Data Types
Configuring Custom Document ID (Index) for Database Uploading
Upload to Database Settings in the Registry
Print Documents in Memory and Upload to Database directly
Print and Save Document into Database Error Codes