
One can specify the creation of several barcode types on the printed documents under the Barcode tab (Start > Control Panel > Printers and Devices > right click on the Black Ice X1 Printer Drivers > Printing Preferences > Barcode tab). Every aspect of the printed barcodes can be configured, such as Value, Barcode Standard, Position, Alignment, Size, Rotation, and so on.
If the Create Barcode checkbox is checked, the X1 Printer Driver prints the barcode on the document with the specified configuration values.

Barcode Option > Insert a page in front of the printed document with Barcode - If this option is checked, the X1 Printer Driver inserts a new empty page to before the first page of the document, and prints the barcode on the inserted page.
· Barcode Option > Add barcode to first page only - If this option is checked, the X1 Printer Driver prints the barcode only on the first page of the document. If the option is unchecked, every page of the document is printed with the configured barcode.
· Type > Barcode Standard - From the Barcode Standard dropdown list, the user can select the desired barcode standard, which is printed in the document.

Black Ice Software X1 Printer Drivers can write the following barcode formats:
|
2D Barcodes |
Linear Binary barcodes |
Linear Non-binary barcodes |
|
Data Matrix ECC-200 |
Codabar |
Code 128 |
|
PDF417 |
Code 11 |
EAN 8 |
|
QR |
Code 3 of 9 |
EAN 13 |
|
Industrial 2 from 5 |
UPC-A |
|
|
Interleave 2 from 5 |
UPC-E |
|
|
Matrix 2 from 5 |
||
|
Plessey |
Click here for more information about Supported Barcode Standards.
· Value - The user can specify the value of the printed barcode by adding the text directly, inputting a file that contains the desired barcode value, or using text from the printed page.
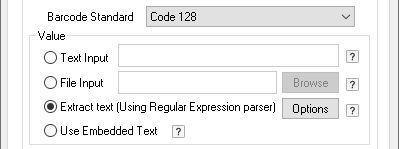
There are four distinct ways to add a barcode to a printed document.
o Text Input: Using predefined static data to be converted to a barcode and printed on every page.
o File Input:Reading a text file during printing and converting the content of the file to a barcode. The barcode is placed on the printed document. The content of the text file can be changed for every page and before or after printing using the printer driver API.
o Extract Text (Using Regular Expression parser): The content of the printed document page is converted to a barcode, and the barcode is placed on the printed document. Using a regular expression to parse the content of the printed document, the content is converted to a barcode, and the barcode is placed on the printed document. If there is no regular expression, the whole content of the page is converted to a barcode.
o Use Embedded Text: When the “Use Embedded Text” option is selected, the Printer Driver will recognize special character sequences which start with two ‘#’ characters on the printed document to extract specific information after the two ‘#’ characters and print it on the barcode. These special character sequences can be used to remove or alter specified texts and write it in the printed barcode (for example to write the Total price and Date on the barcode when printing an invoice).
NOTE: When using “Insert a page in front of the printed document with Barcode” or “Add barcode to first page only” option, then the Embedded Text must be on the first page of the printed document.
For more information on Text Input and File input, refer to the Configure Barcode Printingsection or see the Barcode Printing using regular expressionssection for Extract Text (using Regular Expressions parser) details.
· Position and Settings - At the Position and Settings tab, the user can specify the position and the alignment of the barcode. The type of unit also can be changed to pixels, mm/10, and inch/100.
At the Preview window, the user can see the configured arrangement and size of the barcode in the printed document.

· Size - The user can specify the size of the barcode to Small, Medium, Large, and Custom. The related configurations in the Advanced Settings are automatically synchronized if the size is changed by the user. This synchronization is also done the other way round, that is, from the Advanced Settings to the Size options.