Black Ice Printer Drivers have a built-in feature to upload converted files to the designated SharePoint servers instantly. This feature is available from version 12.00 (2010.03.19) in every Printer Driver.
Silent mode must be enabled to upload the files with Document Converter Server.
On the Filename Generationtab, enable the Upload to SharePoint® option and specify the SharePoint server settings by pressing the Edit SharePoint® settings.
Changing the SharePoint Settings in the Printing Preferences Dialog
On the Filename Generation tab, enable the Upload to SharePoint®option and specify the SharePoint server settings by pressing Edit SharePoint® settings.
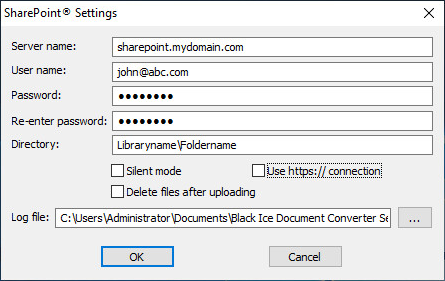
The following values need to be specified in order to connect to the SharePoint server:
Server name: The SharePoint server name.
User account information:
Username: The domain user name.
Password: The password of the domain user.
Directory: The full path of the upload folder.
Server name: The complete URL of the Server has to be specified here, including http://. For example: http://sharepoint.mydomain.com.
User Account Information: Make sure the user account has the Add Items/List Permission or a Contributor Permission levelto the given library or directory; otherwise, the files cannot be uploaded.
Determining the Upload Directory
The upload directory needs to be determined correctly before uploading files.
Here is the basic structure of the SharePoint Site: http://servername/sitename/libraryname/foldername/filename.doc
The Upload Directory is the sitename/libraryname/foldernamepart of the structure above. It cannot start with a forward slash (/).
For example, the Upload directory can be Sales/Invoices/September.
If the SharePoint server does not contain a site, the Upload Directory must be libraryname/foldername.
Most SharePoint sites have a Shared Documents library by default.
The Upload directory can be determined with a previously manually uploaded document.
· Login to the SharePoint page and locate the file.
· Right click on the file name or the file icon, and press Copy Shortcut.
· Paste the path to the Output directory.
· Delete the unnecessary parts of the path, such as server name and filename.
It is recommended to test file uploads after setting or changing the Upload directory.
Enable silent uploading: If this option is selected, the printer driver uploads all the files to the SharePoint server in the background. The upload window and the error message windows do not appear, however, the error messages are still recorded in the log file.
Use https:// connection (SSL):SSL (Secure Sockets Layer) is a protocol that provides communication security over the Internet. Select this option and the printer driver uses secure https protocol to upload all the files to the SharePoint server.
Log file: If the log file is specified, all the SharePoint-related messages are recorded there. The log file contains information about:
- Upload start date
- Source file
- URL
- User
- Silent mode
- Upload finish date, and result
NOTE: Select a place for the logs where all printer driver users have permission to write.
NOTE: If other users cannot see the uploaded file, it needs to be checked in, and published to other users.
More information on how to upload documents (PDF, TIFF, JPEG, TXT, HTML) into SharePoint folders with a single click by using the Black Ice Printer Driver can be found behind the link.