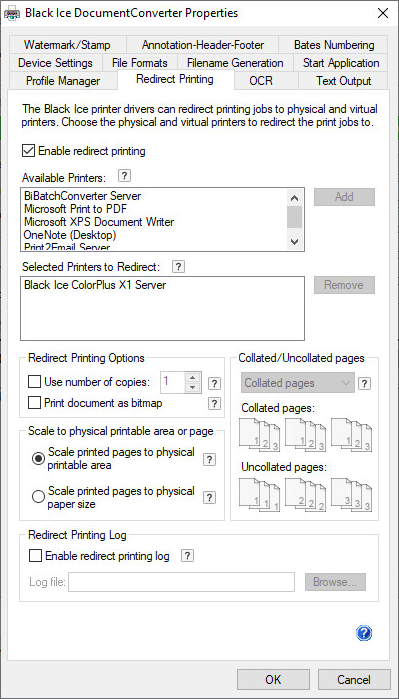
Use the options of the Redirect Printing tab to specify a printer for print job redirection. If printer redirection is enabled, any document printed to the Document Converter Printer Driver is converted into the specified output format, written to the specified output directory, and the document is passed to the redirected printer(s) for printing. Annotation, Barcode, Bates Numbering and Watermarks configurations in Printing Preferences are applied to the redirected output.
Enable redirect printing - The Enable redirect printing checkbox enables or disables the redirect printing feature to one or more printers.
Available options for redirect printing:
Available Printers - The Available Printers list contains the printers that can be selected as redirected printers. These printers are the locally installed printers on the PC, and the shared printers through the network. Select a printer and click Add to add it to the redirected printers list.
Selected Printers to Redirect - The Selected Printers to Redirect list contains the printers that are selected as redirected printers. These printers are not listed in the Available Printers list. To remove a redirected printer, select the printer and click Remove. Label printers can also be specified as redirected printers. Black Ice Printer Drivers can handle certain special paper sizes required by label printers. For more information on specifying paper sizes, refer to the Device Settings Tab section.
Redirect Printing Options
If Use number of copies enabled, the Printer Driver will ignore the number of copies in the printing application and send the number of copies specified in the Printer Drivers settings under Redirect Printing tab to the specified redirect printers.
Collated/Uncollated
If Use number of copies enabled, the Printer Driver will ignore the Collated/Uncollated settings from the printing application, and use the setting specified in the Printer Driver.
Collated printing will print page documents after each other in proper order, while uncollated printing will print the first page copies, then the second page copies, and so on, as on the explanation diagram below.
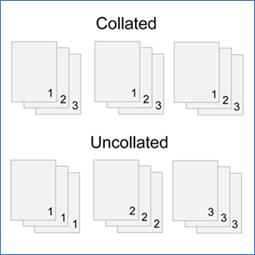
(The numbers on the diagram indicates the page number of the copy)
Scale to physical printable area or page
Scale to printable area: scales the printed page down by the size of the physical margin of the target printer, so content very close to the edge of the page can still be printed and nothing will be cut off. This is the default setting.
Scale to physical page size: scales the printed page to the physical size of the page, ignoring the target printer’s physical margins. This means the output will be the exact same size as when printing directly to the target printer. Content outside the physical margins of the target printer is cut off.
Enable redirect printing log - Enables or disables the log file generation specifically for redirect printing. Log filename and location can be specified. The redirect printing log file contains the following information:
· Redirect printing start time
· Printed document name
· Redirect Printers Count (Number of printers configured to redirect)
· Number of copies
· Scaling mode
· Redirect Printer Names
· Printed pages
· Redirect printing finished time
· Collated/Uncollated
NOTE: Select a place for the logs where all printer driver users have permission to write.
NOTE: Environment variables can also be used to specify the directory.
Restore defaults - The Restore defaults button restores all the default printer settings from the printer configuration .INI file. The Save As dialog options revert to the same default settings as well. This operation deletes all the custom paper sizes. Once pressed, the following warning message is displayed: