
Description:
Demonstrates how to capture and save PDF, TIFF, BMP or EMF images, OCR data printed and text data printed into memory with the Black Ice ColorPlus, Color, Monochrome and EMF Printer Drivers by using the “Generate output in memory” , "Generate OCR output in memory" and "Generate text output in memory" options of the printer driver for HIIPA compliant application.
How It Works:
The sample uses the StartCapture function of the BiPrnDrv.ocx. It is using the Named Pipe method, as described in the Messaging Interface section of the RTK manual.
NOTE: The printer driver adds a Message Interface ID to the interface name. By default the sample and the OCX uses the Message Interface ID that is currently used by the printer driver, and the printer driver uses the Windows Session ID of the current user as the Message Interface ID. For more information about the Message Interface ID including instructions about how to change the Message Interface ID used by the printer driver, please see the following page in the manual: Message Capture – Using Messaging Interface ID
Override the Message Interface ID
To override the Message Interface ID, one must set the Message Interface ID key in the SampleSettings.ini file:
[Print to Memory]
Message Interface ID=15
The sample will change the Message Interface ID of the Driver to the specified value.
If the Message Interface ID key is not set in the INI file or it is set to -1, the current printer setting is used.
NOTE: If the Sample applications is set to override the current Message Interface ID, the Sample must be started earlier than the printing application.
For more details of the message capture method, please see the Messaging Interface section of the manual
Logging, Changing the Settings
Edit the INI file of Sample, called SampleSettings.ini. The following option must be specified in the INI file:
[Printer Settings]
Printer Name=<Name of the Black Ice Printer>
[Print to Memory]
logfile=c:\PrinttoMemory.log
Message Interface ID=-1
Description of the settings:
Printer name: Fill in the name of the Black Ice printer to be used by the Sample (without ‘<’ and ‘>’)
logfile: Specifies the log file’s location and name. The sample logs every messages during the printing.
Message Interface ID: Sets the Message Interface ID of the Printer to the specified value. If this value is not set, or set to -1, the sample uses the printer’s current setting. To run multiple instances of the Message Capture Sample using different Message Interface IDs, make separate copies of the Message Capture Sample and the necessary files listed in the Additional files needed for redistribution section below, in separate directories. This way you can set each copy to a different Printer and Message Interface ID.
Trying the Sample:
Open the Black Ice printer driver’s Printing Preferences window, on the File Formats tab select a suitable format (PDF, TIFF, BMP or EMF) and check the Generate output in memory box.
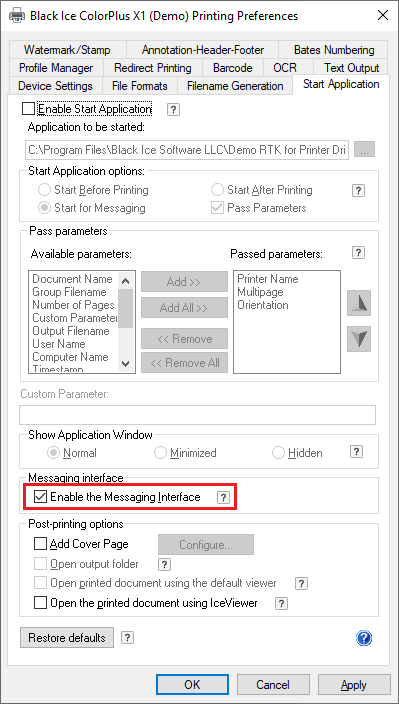
Make sure that the Messaging Interface is enabled in the Printer Driver Printing Preferences > Start Application tab:
OCR data(feature is available from version 14.98)
The sample can read the OCR data from memory, if the Generate OCR output in memory feature is enabled
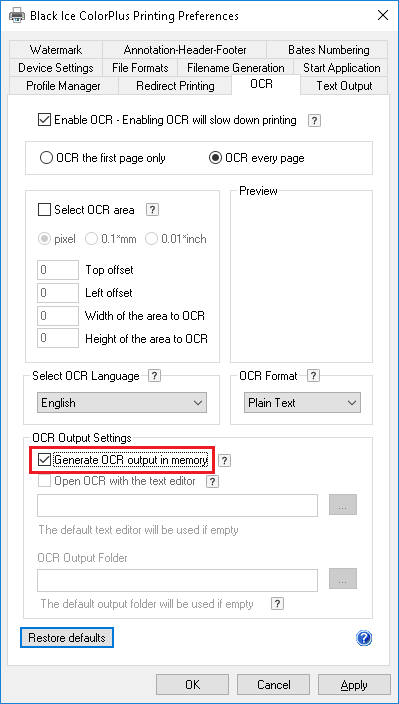
The extension of the Plain Text OCR format is txt
The extension of the hOCR format is html
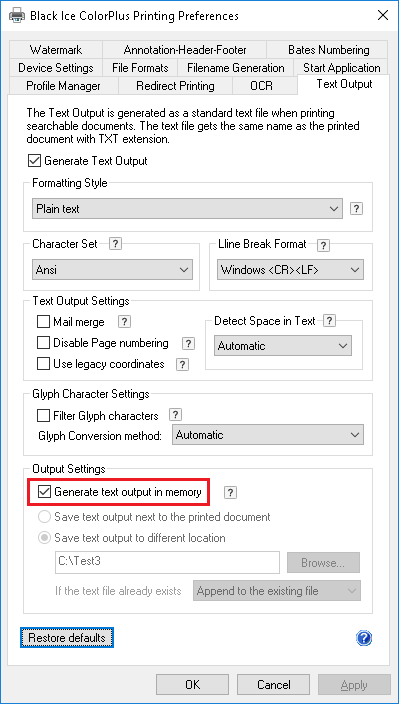
Text data (feature is available from version 14.99)
The sample can read the text data from memory, if the Generate text output in memory feature is enabled
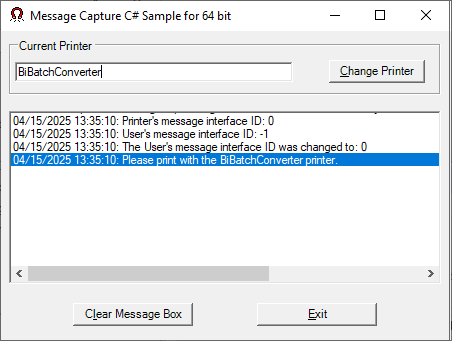
Start the sample application and begin printing. The sample will save the image to the disk, to the location written in the sample window.
Sample Source Code Folder Location:
32 bit
<RTK Installation Folder>\<RTK 32/64 bit>\Samples\Sample Source Codes\C#\Print to Memory OCX C# Sample
|
Solution files |
Compilers |
Target .NET Framework |
|
Print to Memory OCX CS Sample_VS2015.sln |
Visual Studio 2015 |
.NET Framework 4.0 |
|
Print to Memory OCX CS Sample_VS2017.sln |
Visual Studio 2017 |
.NET Framework 4.0 |
|
Print to Memory OCX CS Sample_VS2019.sln |
Visual Studio 2019 |
.NET Framework 4.0 |
|
Print to Memory OCX CS Sample_VS2022.sln |
Visual Studio 2022 |
.NET Framework 4.8 |
Additional files needed for redistribution:
- Print to Memory OCX C# Sample.exe
- blicectr.dll
- BlackIceDEVMODE.dll
- BlackIceDEVMODE.ocx (Needs to be registered into the OS)
- BiPrnDrv.ocx (Needs to be registered into the OS)
- Interop.BIPRNDRVLib.dll
- AxInterop.BIPRNDRVLib.dll (Only for 32 bit)
- Interop.BLACKICEDEVMODELib.dll
- AxInterop.BLACKICEDEVMODELib.dll (Only for 32 bit)
- SampleSettings.ini
These additional files are located in the following folders.
\BiPrnDrv
\BlackiceDEVMODE
\Samples
For detailed instructions on how to create a new project, please refer to the Creating a new project that uses message capture and the print to memory feature section.
Note: Please make sure that you use the appropriate Resource ToolKit, there are two different RTKs.
- API/RTK for 32/64 bit Windows 11, 10, 8.1, 7
- API/RTK for 32/64 bit Windows Server 2025/2022/2019/2016/2012
Using Message Capture and Printing from the Same Process
If you wish to extend the Message Capture samples with printing using AutoPrint, or otherwise combine message capture and printing in the same application, the printing thread must be separated from the message capture thread.
Printing and capturing messages from the same thread will result in lost BLACKICE_MESSAGE_DEVMODE messages. Other messages may appear to work, but they will be delayed. This is because BLACKICE_MESSAGE_DEVMODE messages will wait for response and eventually time out, while other messages do not wait for response and are queued.
Limitations:
A single instance of Printer Driver can interface with either a “Message Capture” sample application or with a “Print to Memory” sample application at the same time.